Tuesday, January 12, 2010

Oh, I'll just...

Have you noticed that the projects that begin with the words, "Oh, I'll just..." have a way of becoming far more time-consuming that originally thought? It's the ones that start with the words, "Oooh, I wonder if..." that are gold. I need to remember this.

This patchwork hat is my latest "Oh, I'll just..." project. As in, "Oh, I'll just cut up a lot of my scrap t-shirt knit and patchwork it together to make a hat for Liv. It'll clean out my scrap bin and make a rockin' hat!"

Yeaaaahhhh...


Serger issues created wonky seams that I was too lazy to resew. That's fine. And I came nowhere near using up all of my scraps. Though I did get rid of of small handful. And some of the infernal gray fleece that I bought years ago thinking I'd make a bathrobe for my dad.

But most importantly, Liv loved the hat. Because she loves anything that mama makes for her.


Liv was totally in the mood to ham for the camera, too.


Toodles,

Monday, January 11, 2010

Back to work, plus a scarf tutorial

Today is the day that I dread each January. The first day of classes. That sounds bad, doesn't it? A teacher should look forward to starting a new semester. HAH!

Don't get me wrong. As jobs go, being an online instructor for the university is a pretty sweet deal. I can choose the hours I work and I don't have to arrange childcare. And I do get a sense of accomplishment when I see improvement in students' writing and when I get feedback from them saying that they've learned a new skill or concept from me. But in all truthfulness, a job is a job and they don't pay you for it because it's fun. It's work, and I'd rather be playing.

So my challenge in the next few months is to give the time to my writing class that's necessary in order to be an effective instructor, while at the same time giving enough time to my crafty endeavors that I can continue exploring and refining my skills. Oh, and do this without neglecting time with my husband and little girl. Can I do this? I think I can! It'll just take focus and prioritizing. Taking advantage of downtime in one area to move another area forward.

Speaking of which, I used my downtime this weekend to write up a tutorial for making this scarf.

.

I call it the Pantaloon Scarf cuz it's gathered like the pants of a pair of pantaloons. The tute is out on Craft Gossip. Go check it out!

Toodles,

Saturday, January 9, 2010

Mock turtleneck, revised and refashioned


I've been a bit of a sweater refashioning fool this last winter. I weigh 25 pounds less than I did last year. That means starting from scratch with cold weather gear. And 25 pounds less of natural insulation means that I need to pile on extra layers to keep warm.
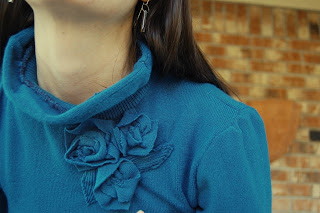
Yesterday I took a less-than-attractive teal mock turtleneck sweater (think mid 90's) and turned it into a fitted funnel neck sweater with fabric flowers.
Check out the "before" pic below. And yes, I'm standing in my bathroom. I cropped out most of the toilet but you can still see it behind me.


Yikes! I have no idea what possessed me to buy this sweater, except that it was only 50 cents and the lady at the yard sale had been digging through her sweater pile for 10 minutes trying to find one I'd take home.

The mock turtleneck bit was kind of saggy and sad, more like a thick ribbed neckband than a turtleneck. I cut the sweater across the shoulder seams and took about 1/2 off of each side. That made a smaller neck hole and moved the "turtleneck" up more around my neck.

Then I cut the extra off of the sides of the body and the sleeves. I used scraps from that to make a ruffle to stitch to the top of the turtleneck. At least that's what it was supposed to be. In reality the extra fabric from the ruffle just smooshed the ribbing of the turtleneck out, rather than the turtleneck bunching in the extra fabric from the ruffle. So it's more of a funnel-neck now. Lesson learned.

I tried adding puff sleeves, but I didn't have enough "puff". Another lesson learned.

When I got it all finished, I wasn't exactly in love with it. It seemed rather like this giant blue expanse across my chest. So I took what was left of the scraps and made some folded fabric flowers to add to the neckline.

(I promise that I'm not jaundiced. Color-adjusting wasn't my friend tonight. But hey, the blue of the sweater is just about spot on.)
And it was then that I noticed that I had set one of the sleeves in inside out. As in, the wrong side of the fabric was facing outward. Yikes! Is there ANYTHING about this sweater that went according to plan?

After I got it all done, I put it on and thought, "ehhh, it'll do." But then it grew on my as the day progressed and now I think it may be one of my favorite sweaters, wrong-side-out sleeve and all. Funny how that works.


I LOVE my new sweater!

And the leftovers. All one handful of them.


Toodles,

Thursday, January 7, 2010

Timeline of a sewing project

Excited about project.

Trying to figure out what the project will be.
Overhelmed with possibilities for the project.

Decide on one and love, love, love it.

Start making said project.

Hrmm... project isn't turning out as expected.

Unsure of the project.

Dislike the project.

Hate the project. This will never work. What was I thinking???

Make changes to fix the project. This could still work.

Love the project! Even better than the original idea!

Work, work, work on the project.

Hrmm... project isn't turning out as expected - AGAIN.

It was better before I "fixed" it. Damn.

Disillusioned with the project. This was a huge waste of time!!

Set project aside and go watch TV, while trying to figure out how to put the half-finished project to new use.

Avoid the project.
Avoid the project.
Avoid the project.
Avoid the sewing room because the project is in there, taunting me.

Grow tired of the avoidance, and decide to take the project to its crappy conclusion.

Hrmm.... This isn't as bad as I thought it was. Just need a little tweak here and there and...

WOW! This project is AWESOME!
Love, love, LOVE the project!!!


"Oh this? It's just something I made one afternoon. Nope. Don't be impressed. It was really easy to make."


Toodles,

Wednesday, January 6, 2010

Tutorial: Heart-shaped strawberry makes a lunchtime treat


So aside from renewing my commitment to my personal blog, another one of my New Year's resolutions was to fix healthier lunches for Liv. But healthy food is not enough, the child has to actually EAT it. And when all the other kids at school are opening brightly colored packages of sugar-packed chips, cookies, etc., plain-jane healthy food just doesn't compete.

Starting this week, I've started packing her lunch in a bento box with food cut into small bits and arranged prettily. So far, it's gone well. The healthy food is getting eaten, and she reported back how cool her friends thought her lunch was. Yay!

This morning I packed a trio of strawberries in her lunch, and cut them into pretty heart shapes. I'm sure I'm not the first person to happen upon this presentation idea, but thought I'd give a quick little how-to just in case you haven't seen this before. It only takes a few cuts to go from whole strawberry to pretty little heart.

Want to know how?

First, start with a whole strawberry.


Second, cap it. (That sounds awfully violent, doesn't it?)


Now, cut a small V out of the center.


Next, shave a tiny bit off each outer side to create a more rounded edge.


Now shave a little off of the inner sides (the top of the V) to smooth those edges.


Voila! A heart-shaped strawberry. Easy peasy, lemon squeezey.


I arranged three of these strawberry hearts into the corner of her lunch box, along with a small container (REALLY small) of sugar for her to dip them in. I know, I know. Sugar doesn't make a healthy lunch, but she won't eat tart berries. And still better than the pre-packaged, artificially flavored alternatives.
These really are easy to make - and quick, too!

Toodles,

Monday, January 4, 2010

65 Roses quilt block

Have you seen Whip Up's call for donations to the 65 Roses charity quilt project? Kath_red from Whip Up is collected quilt blocks made with a rose embellishment. They'll be sewn together into a quilt that will then be auctioned off at a gala benefit in Canberra, Australia to raise money for Cystic Fibrosis.
When I saw the announcement, I knew I had to contribute something. My dear dear friends Debbie and Kimberly lost their daughter/niece Jennifer to Cystic Fibrosis several years ago. In spite of everything she had to endure, Jennifer maintained a sunny disposition and an optimism that inspired everyone she knew. This block was made in honor of Jennifer, her mother Debbie, and her aunt Kimberly.


The upper lefthand block is made from linen, repurposed from a jumper that my mother gave me. (Gawd, it was a hideous jumper but it's made a ton of cool craft projects!!) The rosette is made from a scrap left over from a sweater refashion for my daughter. I just cut a curved strip of it and stitched and flipped and turned and coiled and stitched more until it made a little rosette shape. I had a turqouise button all picked out for the center, but the rosette ended up looking better without it.

Here's a close-up of the flower. I love the dimension of it! And the sweater knit is soooo soft....


You can see some 65 Roses quilt blocks that others have made at the 65 Roses Quilt for Charity flickr group.
Toodles,

Sunday, January 3, 2010

Little girl sews

Liv and I worked on a sewing project today. She's making a pair of pajama pants for herself. So long as I draw out the stitching lines with an air-erasable marker, she can stitch a fairly straight seam.

She was sewing rather indepedently today so I thought I'd grab a little video. The sound is a little low on this, so if you want to hear what she says you'll need to turn up the volume.

It cracks me up how she looks like a little adult sitting at the machine, working the fabric and removing the pins.


"What do you like about sewing?" "It's fun and it's hard." She soooo gets it!

Toodles,